Please notice: This article is more than 3 years old
Content, Source code or links may no longer be correct in the meantime.
August 12, 2020 | 22:44Reading-Time: ca. 10 Min
Nextcloud Backup with tar
Installing a Nextcloud instance is a snap. There are numerous tutorials and, on better NAS systems or hosting providers, even ready-to-use appliances that can be easily clicked together. When it comes to data backup, my observation is that the sources are rather limited and I would rather not use the few manuals that are available on the net.
This blog post wants to help increase data protection with an automated, daily and complete backup for your Nextcloud. It is aimed at private users. The focus should not just rest on the script, but rather on the thoughts and considerations around it.
Pre-considerations
There are numerous backup solutions, starting with bare-metal backups of entire servers or partitions, tar, rsync or borg for complete or incremental data backups, up to 7zip for encrypted transfer of data to third parties. This are only a few free solutions. And I don’t even want to mention the many non-free ones like Acronis, Veeam & Co.
Why tar?
My ideal solution of a backup strategy is not just one, but several coordinated tools. For the requirements and data volumes in my Nextcloud instance I have chosen GNU tar. The benefits:
- It’s free software.
- Easy handling and integration within scripts.
- Highly compatible with virtually all unixoid systems (POSIX standard).
- Proven stability and reliability for decades, essential for long-term archiving.
- Directory structures, permissions and ownerships are stored in a handy backup file (“tarball”).
- Backup files can be easily copied to external media or between computers on an ad hoc basis.
- It does not require background services, extra users or even a full blown backup infrastructure consisting of repositories, index databases, media management systems or fancy web interfaces (KISS principle).
Technical requirements
The backup destination is a SMB share on another computer, in my case a FreeNAS. The script assumes that this share is directly accessible. In case you run your Nextcloud in separate network segments, you have to set up this direct connection possibility in firewall and/or routing tables.
Everything is also written from the perspective of Debian. When applying to various derivatives, please keep this in mind. The script is started and afterwards executed by cronjob under the user root. A sudo does not exist by default on a freshly installed Debian server and should therefore be installed alongside with cifs-utls:
# apt install cifs-utils sudo
Furthermore, I assume a working mail server that can send status messages with “sendmail”. To check if this is set up properly use the following one-liner. If everything works, an empty e-mail should end up in your mailbox:
# sendmail "email@domain.tld" < /dev/null
Moreover, I assume that the mySQL/MariaDB database and the Nextcloud /data directory are on the same host. As far as it concerns the /data directory, please also read the section under “Optimizations”.
Data Quantity & Duration
Most of my data is stored on a FreeNAS and is mounted as “external storage”. This keeps the Nextcloud quite lightweight. In my example we are talking about " just" 31 GB of data to be backed up, which takes about 30 minutes. An acceptable downtime of the Nextcloud, which is put into maintenance mode during full backup and is not usable during this time.
Push vs. Pull
From a bird’s eye view, there are basically two strategies for data backups: Push and pull backups.
With a Push-Backup the backed up host connects to a generally central backup server and copies his data over there. The opposite case is called Pull-Backup. In this case, a central backup server connects to the host to be backed up and pulls the data according to a predefined logic.
Viewed at first glance, a pull backup seems more secure. In practice, the situation is a little bit more complicated. Here are some arguments speaking against a pull-backup strategy:
- An additional backup account with sudo rights must be created on the host being backed up - on each of potentially multiple hosts in a company or entity. But what are admins doing on a predictable regular basis? They create universally valid accounts with unified passwords on all hosts, effectively a “multipass” for any hacker.
- Remote access must be provided for such backup accounts in addition to administrative access via SSH, VPN or SMB shares.
- Since every initiative comes from the backup server, it must also provide all the logic and take all eventualities into account. It’s fun when a host in the middle of an important task requiring every core and every byte of I/O is interrupted by a backup server.
- A centrally stored logic usually scales less well eand must cope with exemptions and individual adjustments when multiple servers are used. Small scripts can become very complex. No admin wants to see in this critical space.
- Only a few applications allow themselves to be backed up while in operation “live”. Downtimes are also expensive and should be avoided at all cost. Therefore, many servers keep a backup of their data until a backup server finally shows mercy and picks it up. In the meantime, these backups offer an ideal window of opportunity to grab or manipulate data that previously did not exist in live operation and will never again exist in the backup.
As usual, it is a trade-off between advantages and disadvantages, and also based on existing circumstances.
The script shown here works with the push strategy, i.e. the Nextcloud mounts a SMB share, copies the data and then unmounts it again.
The encryption thing
Except the fact that tar does not offer encryption, it is not desirable to use encryption in our scenario due to other reasons:
- Encrypted backups increase complexity and create additional problems that you don’t want to deal with in long-term backups. For example, expired or forgotten keys, or containers with dependencies that have become obsolete over the years, could prevent people from accessing their backups.
- We operate entirely within a controlled and protected environment.
- It is futile to encrypt individual backup files if this is already done on an underlying level through a file system. In my case, it is the FreeNAS RAID with ZFS and enabled disk encryption.
Data should only be encrypted, preferably only where there is a transfer or shipment from your own secure environment to an insecure one (e.g. when backups are stored on hard disks at third-party).
Practice
Preparations
The credentials required to mount the SMB network share should be stored in a text file in the root home directory. Unreachable for other users. The name of this file can be chosen freely, so we will name this “.smbcredentials”. The content consists of three text lines only, in which the credentials have to be entered:
username=
password=
domain=
With mysqldump we will also make a full backup of the Nextcloud database and need also the credentials for this. Hence, we need to store the access data in the file “.my.cnf” in the root home directory as well. This filename is predefined and must be copied exactly as it is.
[mysqldump]
user=
password=
In order to mount the SMB network drive, a suitable folder is required. The script expects this below /root. There you simply create a subfolder called “backup”.
# mkdir /root/backup
Once the credentials are stored, the script can be started.
The Script
Using a text editor of your choice, a text file named “backupscript” is created in the root home directory and the following content is inserted in it.
The script consists of two parts. In the first one all required parameters are set and must be customized to the individual use case.
The second part contains the main script. You should not change it until you know what you’re doing. For better understanding I have commented each line.
Two important leads: At the end of the script there is a cleanup of any created temporary files. Anyone who needs the logfile can take it out here.
There is also no check of the available disk space on the target drive. I assume that this will be checked and cleaned from time to time.
#!/bin/bash

# Datum Praefix vor den Dateinamen YYYYMMDD
DATE_PREFIX=$(date +%Y%m%d)

# SMB-Netzwerklaufwerk
SMB_DIR="//remotehost/share"

# Mountingpoint vom SMB Netzwerklaufwerkes
MOUNT_DIR="/root/backup"

# SMB Credentials Datei für die SMB Zugangsdaten
SMB_CRED_FILE="/root/.smbcredentials"

# Das Nextcloud Verzeichnis
NEXTCLOUD_DIR="/var/www/cloud.domain.tld"

# Der Datenbankname
NEXTCLOUD_DB=nextcloud

# Name und Ablageort der Statusdatei YYYYMMDD-backuplog.txt
THE_LOG="/root/$DATE_PREFIX-backuplog.txt"

# Name und Ablageort des Datenbank Dumps
THE_DUMP="/root/$DATE_PREFIX-cloud-DB.sql"

# Empfänger der Statusdatei
SEND_REP="email@domain.tld"

# Exclude Dateien oder Ordner
EXCLUDE_PATTERN="--exclude='$NEXTCLOUD_DIR/data/updater*' --exclude='$NEXTCLOUD_DIR/data/*.log'"


# -- Bitte ab hier nichts mehr manuell anpassen --

# Erstellen der Statusdatei und Hinterlegung der Startzeit
echo "Beginne Backup (Startzeit: $(date +%T))..." > $THE_LOG

# SMB Laufwerk mounten
mount -t cifs -o credentials=$SMB_CRED_FILE $SMB_DIR $MOUNT_DIR

# Wartungsmodus der Nextcluod aktivieren
sudo -u www-data php $NEXTCLOUD_DIR/occ maintenance:mode --on

# Erstellen mysql Dump
mysqldump $NEXTCLOUD_DB > $THE_DUMP

# Alles in das Zielverzeichnis mit tar sichern
tar $EXCLUDE_PATTERN -cvpf "$MOUNT_DIR/$DATE_PREFIX-cloud.tar" $NEXTCLOUD_DIR $THE_DUMP

# Wartungsmodus deaktivieren
sudo -u www-data php $NEXTCLOUD_DIR/occ maintenance:mode --off

# Zielverzeichnis prüfen, Stopzeit festhalten
echo "...Backup beendet (Stopzeit: $(date +%T))" >> $THE_LOG
ls -lh $MOUNT_DIR >> $THE_LOG

# Statusdatei senden
sendmail $SEND_REP < $THE_LOG

# Garbagge Collection
rm $THE_LOG $THE_DUMP &
umount $MOUNT_DIR
Once the file is created, it must be made executable:
# chmod +x /root/backupscript
That’s it! The script can now be started manually or automated e.g. with crontab at night or during weekends. The only requirement: It must be run in root context.
Optimizations
Depending on the number of users and the amount of data, a backup may take its time. Since the script intentionally makes complete backups, it contains some small but nice optimizations:
Skip Files
The first optimization option is to skip the usually very large log files. The updater directory with the backups of previous versions can also be left out. For this reason the EXCLUDE_PATTERN line exists:
EXCLUDE_PATTERN="--exclude='$NEXTCLOUD_DATA_DIR/updater*' --exclude='$NEXTCLOUD_DATA_DIR/*.log'"
Cleanup Trashbin
Another boost is the trashbin cleanup prior the backup. I did not include it in the script. But if you want to, you may add the following line between switching the maintenance mode on and creating the database dump:
sudo -u www-data php $NEXTCLOUD_DIR/occ trashbin:cleanup --all-users
Backup Time vs. Disk Space
The script backs up without compression to keep the downtime as small as possible. If you don’t care about this and if you prefer small, compressed tarballs, you can activate the -j option (for bzip2) and of course add the file extension:
tar $EXCLUDE_PATTERN -cvjpf "$MOUNT_DIR/$DATE_PREFIX-cloud.tar.bz2" $NEXTCLOUD_DIR $THE_DUMP
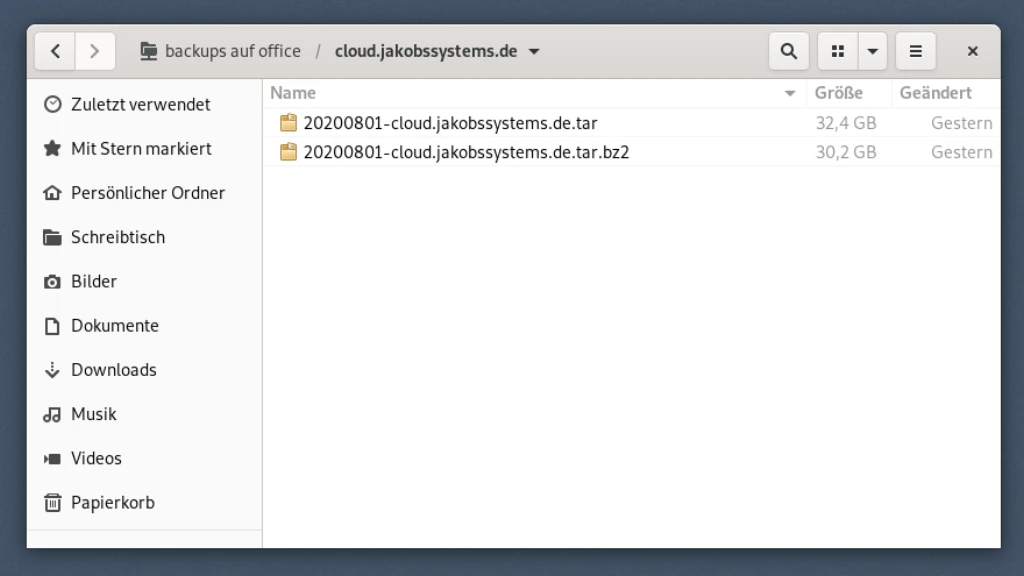
In my case compression is not economical, since the benefit is only 5% (2 GB) of additional disk space but at the cost of 4x longer downtime (2h instead of 30 min). Your milage may vary and of course there are other compression methods besides bzip with different compression ratios.
Where’s the /data folder?
The biggest benefit gains, not only in terms of security but also in terms of performance, is achieved by the correct location of the /data directory. This should be outside the Nextcloud folder if possible. Ideally on a different hard disk.
The script assumes the Nextcloud installation defaults without a relocated /data directory. If you have put it somewhere else, then you should add an additional variable NEXTCLOUD_DATA_DIR:
# Das Nextcloud /data Verzeichnis
NEXTCLOUD_DATA_DIR="/var/data"
The exception list must be modified too:
# Exclude Dateien oder Ordner
EXCLUDE_PATTERN="--exclude='$NEXTCLOUD_DATA_DIR/updater*' --exclude='$NEXTCLOUD_DATA_DIR/*.log'"
Finally, the line with the main tar command should look like this:
# Alles in das Zielverzeichnis mit tar sichern
tar $EXCLUDE_PATTERN -cvpf "$MOUNT_DIR/$DATE_PREFIX-cloud.tar" "$NEXTCLOUD_DIR" "$NEXTCLOUD_DATA_DIR" $THE_DUMP
Parallelization
What’s the difference between
mysqldump $NEXTCLOUD_DB > $THE_DUMP
and
mysqldump $NEXTCLOUD_DB > $THE_DUMP &
Well normally, instructions in bash scripts are processed sequentially. The ampersand “&” at the end of the line means that the command is processed in the background and thus parallel to the next line(s) in the script. Depending on the size of the database, you may save a few minutes of runtime.
But this can be done when it’s sure that the backup time of the database dump is finihed before tar tries to put it into the tarball. Under normal circumstances this should be the case, but I recommend to check this out in advance.
No backup = no mercy
There is no mercy nor excuse for a lack of responsibility. Especially not if you share a Nextcloud with others. Even when talking about a private “family cloud”, it usually represents an important part of personal life, with all the pictures, conversations and shared data pool ranging from important documents to shared memories.
This blog post proves: A complete and automated backup is no magic.
Have fun
Your Tomas Jakobs